A few months ago, gripped by baking fever, I purchased Mary Berry's Baking Bible. I quickly decided to embark upon a mission to bake everything in the book, and turn myself from an occasional baker into a bit of an expert. My Grandad Ern was a Master Baker by trade; the man responsible for introducing Danish Pastries to England in fact, and I wish it had occurred to me to spend more time learning from him, rather than simply enjoying the fruits of his effortless labours. This project is almost a way of making amends for that; I'd like to follow in his footsteps (if not in my career, at least as a hobby) and continue the proud heritage of baking in my family.
I credit my friend Rachel with the idea to write a blog about my baking exploits, hoping that there will be more successes than failures as I attempt all 213 of the Queen of Baking's recipes.
So as not to bore the husband with a monotonous diet of sponges, followed by weeks of biscuits, I've decided to tackle the recipes by selecting the first bake from each chapter, followed by the second recipe and so on. I'm not going to pick and choose; I'm determined to face my baking demons and learn how to do everything baking-related, even if the consequences are disastrous!
Everything will be photographed, with comment about how I found baking it, and a husband rating (to be taken with a pinch of salt as he has a very selective cake-tooth).


Sunday 17 February 2013

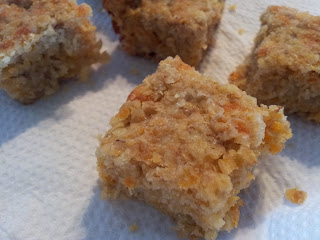
Cheesy Flapjacks

These are a non-Mary Berry addition, baked on a whim because I fancied flapjack and cheese (both pregnancy staples). I've made these several times over the years, and despite husband's protests that the combination was an unpleasant one, I knew it worked. Very simple to make: recipe below. It came from a supermarket magazine, submitted by a reader, years ago. They're just something different from the usual flapjacks and cheese scones. Taste lovely still warm but are still satisfying when they've cooled down.

Recipe: 85g butter (melt in a pan); 115g grated cheese (I used Red Leicester but Cheddar is fine); 1 large beaten egg, 150ml natural yoghurt, black pepper and 225g rolled oats. I added a tsp of mustard powder as well. Stir it all together and spoon into a greased 7in square tin. Bake for 30 minutes at 180 degrees C (I did them at 160 for the fan oven) until golden. Cool in the tin and cut into squares.

Baker's verdict: easy and satisfying. No bells and whistles!
Husband rating: reluctant to try them...feels funny about the idea of them!
37. Dark Indulgent Chocolate and Walnut Brownies


Sometimes there is nothing to do but bake, and subsequently feast on, gooey chocolate things. I could say I felt compelled to make these simply because I had some walnuts which needed clearing up, but the real reason was the overdue baby. Having an excess of walnuts was justification; let's forget about the trip to the supermarket to 'stock up' (on 3 big bars of dark chocolate and 3 bags of chocolate chips). I enjoyed the whole process of making these; it seemed to have a very calming effect on me, not least because I was making them at my leisure rather than against the clock for impending guests.

The first process involved melting an obscene amount of chocolate (350g) with some butter over a pan: a heart attack in a pyrex dish! There is little more satisfying than poking melting chocolate with a wooden spoon to help it on its way. While the mixture cooled, the process of blending everything else could begin - the eggs, sugar, pre-chopped walnuts and small quantity of instant coffee. I was surprised by the comparatively small amount of flour required, but brownies are supposed to be very dense without the usual 'raising' involved with other cakes. Once the chocolate was added, they needed to bake for about 45 minutes.

The smell emanating from the oven was glorious. I always enjoy disappearing upstairs while things are baking and then gradually exposing myself to the delicious aromas as I make my way back to the kitchen. My mum, meanwhile, enjoyed sitting at the kitchen table surrounded by a chocolatey fog! I checked with a skewer after 40 minutes and decided to give them another 2 to firm up the top: in hindsight they should've come out the first time, as they ended up being a little dark around the edges. We waited several hours for husband's return so we could enjoy the first tasting with him - resorting to watching out of the window for him to drive up the road, such was our desperation to get stuck in! They were worth the wait; a beautiful texture and extremely yummy.
Baker's verdict: very easy and satisfying to make; delicious with a lovely texture.
Husband rating: 10/10 - amazing brownies: rich yet light with lovely crunchy bits. Nice bursts of chocolate and nice crispy outside. Lovely. Can't fault it; perfect brownie. The second piece had some slightly burnt edges, so they lose a point for that.

Thursday 14 February 2013

36. Lime Lattice Cookies

Still working my way through the biscuit chapters, I baked these for some friends coming for morning coffee (tea for Rhonda). I thought I'd ring the changes from Fork Biscuits, although these were actually very similar; the addition of lime being the only difference. I grated the rind of two luscious limes, which filled the kitchen with their glorious scent and made our mouths water in anticipation. I did rush the mixture and bung everything in together, rather than creaming the butter and sugar together first, but I really don't stress about such things these days, now that I know what the subsequent processes entail. Something I found odd about this recipe was that there was no instruction to press the cookies down before baking. I had to roll them into walnut-sized balls and then use a skewer to make a lattice pattern on the top. I thought I'd bake 'by the book' and follow the recipe to the letter and see what happened. They were meant to bake for 15-20 minutes, but they were still quite anaemic-looking after 20 so I gave them another 5 minutes just to brown up a bit. We actually ate them still a bit warm (could wait no longer and the drinks were getting cold!) and they were nice and comforting and soft like that. Inevitably, they became more 'shortbready' once they'd cooled down. They need to be eaten within 3 days really - the last ones left were a bit on the stale side.
Baker's verdict: very simple to make; I'll press them down next time so they look better. Lovely tasting - never had lime biscuits before, but the flavours work really well. I always use salted butter; I could detect the salt, so I might see what they're like with unsalted butter another time.
Husband rating: 8/10 - amazing flavour of lime. Slightly bitter which went well with the sweetness. Almost like having lime cheesecake. Strangely, as good as they were, I only wanted one.

35. Mini Cakes

I have to say that this has been one of the most comical bakes I've done, to the extent that making these didn't really seem worth the effort! The most amusing element was husband not realising quite how 'mini' they would be, despite being sent a photo of my handiwork when they came out of the oven. He'd imagined them to be the usual 'bun' size, not the mouthful morsel they actually were, and then felt a bit embarrassed about taking them into work for his colleagues!

The recipe was basically the same as the all-in-one sponge recipe, but using smaller quantities. It was quite fiddly working with the petit-fours cases, manoevering 'scant' teaspoonfuls of the mixture into them. I didn't even attempt to level them off, just plopped the mixture into them in quite a haphazard fashion. I knew they'd spread out and fill the cases properly during the baking process. They didn't need long in the oven; I had to bake them in two batches so both had the benefit of the top shelf.
Decorating them was easier than expected; a simple mixture of icing sugar (lots) and water so that I could just dollop small amounts on each one and spread it out a bit. I decided to use bits of glace cherries rather than the suggested sweets, mainly because that's what I had in the cupboard. I thought they looked like little cakey bakewells when they were finished! I think they're great for children, and would be fab for children's parties; they're not especially satisfying for cake-loving adults though!
Baker's verdict: easy to make, although I'd rather knock up a Victoria Sandwich and get a proper wedge of cake to reward my efforts!
Husband rating: 6.5/10 - too small and too much icing for the size of the cake. Also a bit dry because they were smaller, but they had a nice flavour. The glace cherries worked well and they looked neat and professional.


Monday 4 February 2013

34. Iced Chocolate Traybake

As being on Maternity Leave gives one the luxury of a bit of time on one's hands, my baking's coming along nicely. The only problem is that I've lost my usual panel of tasters (aka my work colleagues who polish off what Joe and I feel too guilty about stuffing our faces with!) so I have to bake with a different audience in mind. This one was made for my visiting friends, but even my chocolate-loving girls can only manage so much, so the rest was donated to Joe's colleagues. These traybakes are great for serving lots of people - they make 20 pretty big portions, which can be halved for smaller appetites.
They're also very easy to make, following the all-in-one method Mary uses for most of her sponge recipes. I was pleased that, unlike the lemon traybake I made last year, the cake didn't come out of the oven domed in the middle. It was fairly even, which I knew would make icing easier. I baked the sponge the day before I iced it, keeping it covered with tin foil. It needed brushing with warmed apricot jam before applying the icing, and I realised I haven't been passing the jam through a seive as you're meant to. I do feel that maybe life's a bit too short to do such things, especially as it's quite nice to get a little bit of apricot in the midst of a chocolate cake! The icing was very sweet, using lots of icing sugar, but a good consistency to work with. I left it to set before adding the chocolate drops - didn't really think it through - so I had to sort of press them in to get them to stay put. I always find it a challenge to serve cake like this - the cutting into (fairly evenly) sliced pieces was ok, but levering out the first slice is usually a bit of a shambles! It felt quite dry in texture as well, like I'd maybe over-baked it, but actually wasn't too dry in the eating. I think because it's quite a deep tin, you feel like you're getting a big chunk of cake with just a bit of icing on top, which can make it seem a bit on the dry side.
Baker's verdict: easy to make and good for en masse serving. Very light and functional, but not 'mmm' as a chocolate cake should be.
Husband rating: 8/10 - a simple chocolate cake, not as moist as it could be. Tasty, nice and chocolatey with nice icing on top. Just felt like it was missing something, like a bit of cream or something.
The rapidly emptying tin was met with disappointment by the colleagues...

33. Cheese Scone Round

After watching my Mum eat a cheese scone on a lunch outing, I decided instantly that I needed to bake some myself: cheese scones have been my pregnancy allies! I didn't plan to make one big one like this, but in the interests of remaining faithful to my project, I followed Mary's instructions to the letter, planning to adapt it to make smaller scones the next time. However, I did substitute cayenne pepper for mild chilli powder, not having any of the former in our usually well-stocked spice cupboard. I found this a very easy recipe; the only element I had an issue with was the liquid. I had to break the egg into a measuring jug and then 'top up' with milk to make a certain quantity of liquid. My hand wasn't steady enough and I poured a bit too much milk in, so the exact science of baking was disrupted slightly. I didn't use all of the liquid, but I do think the mixture was too wet, despite giving it a good knead in the flour on the work surface. At least I have some notion of the texture it shouldn't be - the 'doughy' nature of the bake only really became apparent once I'd cut into it and found a stodgy bit in the middle. Perhaps I didn't bake it for long enough, but there was definitely a soggy centre. This also turned a rather unappetising shade of grey over the next day or so! That said, it tasted good, and any further baking might've spoilt the outside of it, which was nicely browned when I took it out of the oven.
Baker's verdict: a bit of an experiment, with a few flaws I think I can easily rectify. I didn't get much scone for my effort - part of me thinks buying them in the shop would be just as rewarding, but the taste was great, and of course it was lovely served warm from the oven with lots of butter.
Husband rating: 7.5/10 - very tasty, just a bit doughy in the middle. Lovely and cheesy; don't normally like cheese scones but this was very nice and had a nice tang to it as well.

*UPDATE*
I followed this recipe the other day to make a batch of scones and they turned out really well. I had cayenne pepper this time, which actually made them a bit too spicy, so I'd either omit or put less in next time. I'm definitely coming on as a baker, as I was more careful with the liquid and got a better consistency, without using all of it. I tried not to 'overwerk' as Paul Hollywood would say, and didn't twist the cutter when I cut out the scones - these are little tricks I've picked up over the years. They got a pretty good rise, and apart from being a bit on the hot side, were really tasty. I'm looking forward to making more!